Identify parts, verify the setup, and work through each HydroPip stage.
HydroPip Build & Care Guide
Build, grow, harvest, repeat.
Follow the HydroPip build from the parts list and assembly through feeding, harvest, and the next crop.
How HydroPip moves water
One tank. One nutrient batch. Timed tower feeds. Tower runoff does not return to the IBC.
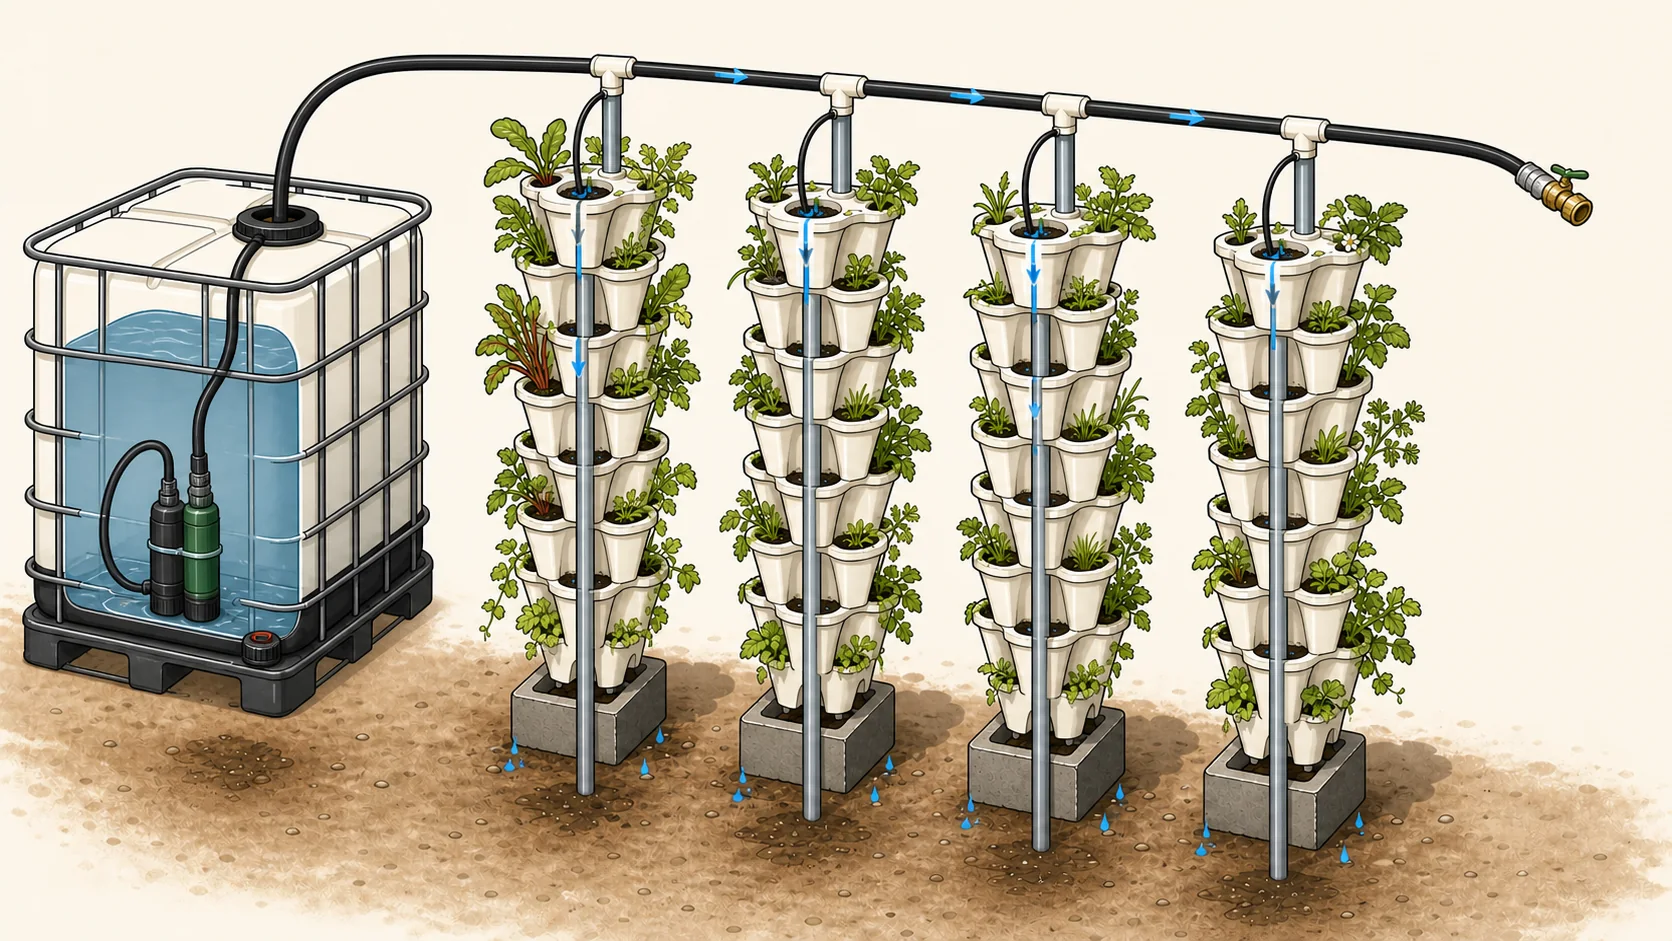
- The standard four-tower build uses a 275-gallon IBC; use your actual filled water volume when calculating nutrients.
- A low mixing pump circulates the batch through its own secured hose discharging down through the top opening.
- A separate feed pump supplies the main hose and the small tubes at the top of each tower.
- Water moves through the reusable media. Light runoff leaves the towers without returning to the reservoir.

Meet your grow guide
Need a hand? Ask Pip.
Ask Pip about available space, parts, tower assembly, nutrient mixing, feed timing, runoff, plant symptoms, pests, harvest, or tower turnover. Pip answers briefly by default and can walk through a full procedure when you need it.
Use plant observations, pH, EC/TDS, weather, and media condition to choose the next check.
Pip Pro saves crop schedules, reminders, plant notes, photos, history, and plans for other systems.
Pip Pro remembers your grow zone, crops, plant notes, tasks, and conversations.
Build your HydroPip towers
Prepare the site and supportsHydroPip timed-feed towers
Check sun, drainage, working space, and utility locations before installing supports.
- Call 811 and wait for utility marking before driving supports. Locate private irrigation, septic, electric, and water lines too.
- Leave room to reach the reservoir, harvest, service hoses, and lift tower sections. Confirm safe power access.
- For the standard tower, use an 8–10 ft, 1/2-inch galvanized center support with roughly 5 ft above grade. Ground and wind conditions determine anchoring needs.
- Set a level cinder-block base and verify that the support and base are stable before stacking.
Fill and stack the towersHydroPip timed-feed towers
Fill sections before stacking, and keep the top guide removable.
- Moisten the 50/50 perlite–vermiculite media lightly. Fill the four-pocket sections evenly without packing hard.
- Lower ten sections over each center support, rotating pockets for access and keeping the stack straight.
- Place a loose 3/4-inch PVC tee at the top to guide the hose. It must lift off for turnover.
- Check stability and access before connecting water.
Connect the pumps and test deliveryHydroPip timed-feed towers
Test with clean water before planting or mixing nutrients.
- Use a food-contact-appropriate tote with documented suitable prior contents. Do not use an IBC with unknown or hazardous contents.
- Use outdoor-rated equipment and GFCI-protected power. Keep connections dry and elevated, with drip loops. Disconnect power before handling pumps, water, or cords.
- Secure the mixing pump low in the IBC and its separate discharge hose at the top opening, aimed down for visible circulation without splashing.
- Connect the feed pump to the main hose. Route through the removable top guides and branch a rigid 1/4-inch tube into each tower, with a diffuser.
- Fit the hose-end flush valve. Flush debris, close the valve, and check every tower for delivery, leaks, and excessive runoff.
Seeds & transplants
Start seeds with the packet instructionsGeneral growing
Use the variety’s sowing depth and timing; label the crop and date.
- Choose suitable seeds for the season. Use the packet instructions for depth and germination requirements.
- For indoor starts, use clean containers with drainage and a suitable seed-starting medium. Moisten the medium before sowing.
- Provide suitable light and temperature for the crop. Check moisture without leaving the containers waterlogged.
- Record the variety and sowing date in My Crops. Keep unused packets in Seed Vault.
Reference: University of Minnesota Extension: Starting seeds indoors
Prepare seedlings for transplantGeneral growing
Gradually acclimate indoor-grown seedlings before moving them outdoors.
- Introduce outdoor light and wind gradually over about one to two weeks; protect tender seedlings from unsuitable temperatures.
- Choose planting time for the crop and local conditions, rather than a fixed date for every grow.
- Handle the root ball carefully and minimize root disturbance. For HydroPip, confirm moist media, prepared nutrient water, and delivery before planting.
- Record the transplant date and location in My Crops. Check the plants after the move and record any wilting or damage.
Reference: University of Maryland Extension: Planting vegetable transplants
Water & nutrients
Prepare a fresh nutrient batchHydroPip timed-feed towers
Before adding seeds or transplants, calculate for the actual water volume and plant stage.
- Open the nutrient calculator with this grow selected. Check the water volume, nutrient program, crop, and stage before using the result.
- For the HydroPip MasterBlend program, fill with clean water and start mixing circulation. Dissolve magnesium sulfate, MasterBlend, and calcium nitrate separately in that order; do not combine dry concentrates.
- Allow the batch to mix evenly and verify delivery to every tower. Record the recipe and any measurements.
- This timed-feed method lets the reservoir level fall and prepares a fresh batch near empty. Do not apply that refill approach automatically to a recirculating system.
Tune feed timing from observationsHydroPip timed-feed towers
Start with short daytime feeds; check the media and runoff before adjusting.
- Observe a complete feed at a representative tower, then confirm the other towers receive water too.
- If one tower is dry while others are wet, check its branch and outlet before increasing the whole system schedule.
- If delivery is working but media dries too much between feeds, review duration and frequency using plant response and conditions.
- If runoff is heavy or media stays soaked, reduce excess feeding and recheck. Change one setting at a time and record what happened.
Routine care
Check plants and the systemHydroPip timed-feed towers
Look for changes in plants, delivery, and reservoir conditions.
- Check leaves, growing tips, roots where accessible, and the underside of leaves for damage or pests.
- Confirm tower delivery, timer operation, reservoir level, and secured mixing circulation. Check for leaks and dry pockets.
- Keep light out of nutrient water. Review pH if measured and EC/TDS when investigating nutrient strength.
- Log what changed and when in Grow Journal. Use Planner for the next inspection rather than guessing what you last did.
Turn the care rhythm into your calendar with Pip Pro.
Troubleshooting
One tower is dryHydroPip timed-feed towers
Check delivery before changing the feed schedule for every tower.
- Observe which towers receive water during a scheduled feed.
- If none receive water, check power, timer, reservoir level, and the feed pump.
- If only one is dry, inspect its branch tube and outlet for blockage or disconnection. Disconnect power before handling equipment.
- After correcting delivery, recheck that tower and its media. Record the affected plants and the change.
Yellow or pale leavesHydroPip timed-feed towers
A color change alone does not tell you which nutrient to add.
- Record the crop, whether new or older leaves are affected, and whether one plant or the whole system changed.
- Check water delivery, media condition, roots, and recent changes first.
- After circulation, check pH and EC/TDS if available; review the recipe and crop stage before assuming more fertilizer is needed.
- Ask Pip with those observations and a clear photo. Record the next check before making several changes at once.
Unusual roots or algaeHydroPip timed-feed towers
Check reservoir conditions and light exposure promptly.
- Brown, slimy, or foul-smelling roots need investigation; record the appearance and smell without assuming a diagnosis.
- Check reservoir temperature, circulation, debris, and light leaks. Disconnect power before handling equipment.
- For green film, locate light reaching nutrient water, cover it, clean affected equipment appropriately, and recheck.
- If problems persist, gather photos and conditions for Pip or your local extension service before treating.
Harvest & reset
Harvest and record the resultGeneral growing
Keep yield and plant observations with the crop so the next grow can build on them.
- Use crop-specific maturity guidance to decide what is ready; a calendar estimate is not a guarantee.
- Record the harvest date, quantity, and useful observations in Grow Journal.
- Update the crop stage in My Crops and plan the next inspection or harvest.
- If a treatment was used, follow its label’s harvest interval and food-use directions.
Reset towers for the next cropHydroPip timed-feed towers
Prepare replacement starts and inspect the system before replanting.
- Harvest and assess healthy plants that may continue producing elsewhere; check crop suitability before moving them to raised beds.
- Lift off the removable top guide and remove sections from the center support.
- Recover suitable media over a screened tub, remove roots, and inspect pots and feed lines. Do not automatically reuse media from diseased plants.
- Clean and flush as needed, refill sections, and restack. Confirm flow and a suitable nutrient batch before transplanting.
- Record the new crop date and schedule the first follow-up check.
Pip is ready
You do not need to memorize the system.
Use the Field Guide for instructions, Track My Build for the checklist, and Pip when you need help. Explore Pip Pro for ongoing grow planning.
HydroPip crop, pruning, pest, and harvest guidance is educational and may not match your climate, pest pressure, water quality, crop variety, or local regulations. Consult your local agricultural extension office or qualified horticulture professional for region-specific advice, pesticide suitability, pre-harvest intervals, and food-safety concerns. You are responsible for deciding whether produce is safe to harvest and eat.